


How To Use Chrome Digital Signage and the Best Digital Signage Players
WRITTEN BY: TelemetryTV, 02-24-2020

Update: With the release of our new TelemetryTV Box OS we are now recommending TelemetryTV Box OS devices as the primary choice for new digital signage deployments.
TelemetryTV Box OS is our proprietary operating system and the TelemetryTV media player is a secured, optimized and customized platform. TelemetryTV Box OS is easy to use, manage, and scale. This will be our primary platform going forward and will receive the most features and attention.
With TelemetryTV Box OS we have taken all of the best features from Chrome, Android, Windows and Linux and combined them into one digital signage platform. We believe TelemetryTV Box OS will be the most sophisticated digital signage platform on the market.
Key Features of TelemetryTV Box OS
- Kiosk mode
- Serial port commands
- 4k support
- 4 screen video wall support
- USB provisioning
- 5 yr lifespan
- $0 annual costs
- Electron app build
- Static IP
- Remote management
Leverage Your Screens To The Max
TelemetryTV is the only digital signage software you need to drive engagement, productivity and revenue for your business.
Learn MoreChrome Media Players
ChromeOS media players have become one of the top go-to's in recent years for businesses looking to integrate digital signage into their money-making endeavours. The reasons being that Chrome devices are intuitive, inexpensive, and are powerful enough to power digital signage content with no real hiccups.
What is a Chromebox?
The major differentiator between Chrome devices and many other digital signage players on the market is that Chrome media players are the cheapest and easiest option to deploy at scale. Once Chrome Device Management is set up, new screens and Chrome devices can be automatically provisioned onto your digital signage network in a matter of minutes.
Chrome digital signage players also come with access to the extensive library of Google Apps, which can be very useful for creating digital signage content.
Chrome digital signage and software
Like we said, adding new displays and media players to an existing Chrome digital signage network is no sweat. Problem is though, initially setting up a Chrome device is not a simple task at all.
For those without a wealth of technical know-how, the process can be extremely complicated and tricky (as you’ll see below in our how-to guide). And it doesn’t help that ChromeOS devices only offer limited support outside the US.
Each screen on your digital signage network needs to be provisioned with its own individual Chrome device. To do this, you’ll need Chrome Device Management, which requires set-up via Google Admin and a Chrome Enterprise License for each Chrome device on your network ($50 annually, or $30 annually for educational institutions).
Other than that, all you need is a cloud-based digital signage solution that allows you to easily manage and deploy your content.
Chrome device management
What is Chrome Device Management?
Chrome device management is for administrators who manage Chrome devices for a business or school.
As an IT admin for a business or school, you can manage Chromeboxes and other Chrome devices, from a cloud-based Admin console. Enforce policies, set up Chrome features for users, provide access to your internal VPNs and Wi-Fi networks, force install Chrome apps and extensions, and more.
To manage devices that run Chrome OS in your business or educational environment, you need Chrome Enterprise Upgrade or Chrome Education Upgrade. You need to buy it for every Chrome device you want to manage.
Best Digital Signage Players
- CTL Chromebox CBX2
- Chromebox 3
- Chromebox Mini
- Chromebox Commercial 2
- AOPEN Chrome Touch Screen Kiosk
CTL Chromebox CBX2

Here are just a few reasons why the Chromebox CBX2 stands out from other Chrome digital signage players:
• Streams 1080p and 4K content seamlessly
• Comes with 64GB eMMC internal storage as well as 4GB DDr4 RAM (8GB & 16GB Version Available)
• Has a huge number of input/output options—three USB 2.0 ports, three USB 3.0 ports, an HDMI port, and a USB C port
• Possesses favorable processing power compared to its market rivals
The standard model CTL Chromebox CBX2 starts at $259
Chromebox 3

For a cheaper option that the CBX1 that still functions well above average compared to most of its competitors, the Asus Chromebox 3 for digital signage is a great choice. Its performance is slightly less powerful than the CBX1, but that’s to be expected when the price starts at less than half ($250).
Those seeking a Chrome digital signage device to power a small network of displays should opt for the Chromebox 3. It strikes the perfect sweet spot between cost and performance.
Chromebox Mini

The AOPEN Chromebox Mini is the smallest commercial-grade Chromebox on the market, but surprisingly still packs quite a punch. It’s able to stream high-resolution videos with ease. And since it was designed for enterprise solutions, the Chromebox Mini is extremely durable and able to run for long periods of time without any damage or other performance issues.
The Chromebox Mini comes in at slightly over $200. It’s the number one budget option for Chrome digital signage devices.
Chromebox Commerical 2

Speaking of commercial-grade designs, the Chromebox Commercial 2was built to thrive under a heavy workload. Specifically, the Chrome digital signage player can function around-the-clock in tough environments without any sudden lag or issues.
The Chromebox Commercial 2 isn’t just extremely durable, either. It can seamlessly stream 4K videos as well as power two digital displays at one time. If price isn’t an issue and a strong, reliable media player is needed, the Chromebox Commercial 2 is the one to choose.
Using Google Chrome Kiosk Mode
What is Google Chrome Kiosk Mode?
Google Chrome Kiosk Mode ensures that a device is being locked to single or multiple applications to act as a kiosk and do not allow the user to exit the app. Using Chrome kiosk mode is great for purpose-built touch screen kiosks such as a guest registration desk, a library catalog station, or a point-of-sale system in a store.
In a kiosk mode, users are restricted to applications and websites allowed by the company’s IT team, this prevents the kiosks from any other use except for business.
A Kiosk App can be launched manually or set to automatically launch when the device boots up. You can use a Chrome device as a kiosk by turning on Single App Kiosk mode manually for each device, or across multiple devices using the Chrome Device Management console.
For more information on how touch screen kiosk's can increase customer interaction click here.
AOPEN Chrome Touch Screen Kiosk

Businesses looking to streamline operations and save on labor costs should go for the AOPEN C-TILE 22 touchscreen devices. These touch screen kiosks allow consumers to do a variety of self-service actions such as checking in to a hotel, self-ticketing, digital wayfinding, ordering food on digital menus, and signing up for promotions or loyalty programs.
How to setup a Chromebox for use with TelemetryTV
Compared to other OS devices, getting a Chromebox set-up for digital signage can be a challenge. To make it easier on you, follow our step-by-step guide below:
1. Purchase a Chrome Enterprise License
To use a Chromebox for for digital signage, you’ll need to first buy an annual Chrome Enterprise License for each device on your network.
2. Enroll your Chrome devices
Follow the instructions here on how to enroll each of your Chrome media players.
3. Add TelemetryTV to your Google Admin Site
Login to your Google Admin account and navigate to Device Management.
Once there, click on Chrome Management, then Device Settings, and then scroll down and click on Manage Kiosk Applications.
From there you will need to search for the TelemetryTV Media Player app on the Chrome Web Store. After finding it, simply press Add, and then press Save.
4. Connect Google API to your media player
From the Admin Dashboard, click Security. Then select API Preference and tick the box next to Enable API Access. Save your changes.
5. Create a new project in the Google APIs Console
Navigate to the Google APIs Console and press Create Project.
Name your new project, then search for “Admin SDK”. Once you’ve located the Admin SDK page, click Overview on the left side of the page and then hit Enable.
6. Sign up for TelemetryTV
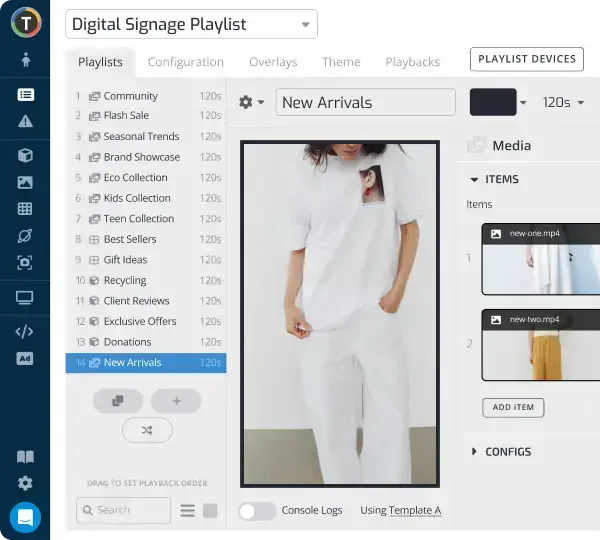
Sign up for a 14-day free trial of TelemetryTV’s simple and intuitive digital signage solution.
7. Pair your TelemetryTV account to the TelemetryTV media player
Go to the TelemetryTV web app and navigate to the Devices page. Click provision and download the provisioning file.
Go back to your Admin Dashboard. Click Device Management > Chrome Management > App Management and select TelemetryTV Media Player.
Click Kiosk Settings and then upload the provision file you downloaded before. Now your device can use the TelemetryTV app and is successfully connected to your TelemetryTV account.
8. Enable the TelemetryTV app to auto-launch
This step allows your TelemetryTV app to auto-launch whenever you reboot it, maintaining a seamless viewing experience and saving you time and hassle.
Go back to Device Settings. Click on Kiosk Settings and under the Auto-Launch Kiosk App dropdown, select TelemetryTV Media Player. Save your settings.
9. Reboot your device
TelemetryTV should automatically provision and be ready to use once you’ve rebooted your device. Now all you need to do is create some killer digital signage contentand send it to your screens via the TelemetryTV web app.
ChromeOS digital signage players definitely aren’t the easiest when it comes to the initial set up. But once you get past that part, Chrome devices prove more than capable at powering digital signage content—especially at scale.
For an in depth guide to getting started with Chrome OS devices, see our help section:
Getting started
Need more help finding the right digital signage player? Check out our list of Best Digital Signage Players.
Outside of purchasing the necessary digital signage hardware, getting started with digital signage is as simple as signing up for TelemetryTV’s 14-day free trial.