


Which Raspberry PI to Use for Digital Signage & How to Use it
WRITTEN BY: TelemetryTV, 07-03-2022

The benefits of digital signage over printed signs are very well known by now. It makes perfect sense to make the switch over to digital signs in many, many scenarios.
But way back when, it used to be that you needed to invest a pretty penny and have a few experts on hand to run a digital signage system. Unlike the digital signage systems of yesteryear, you can now have a DIY digital signage system on the cheap.
Raspberry PI allows you to transform virtually any screen into digital signage as long as you have the right tools. With high quality digital signage software like TelemetryTV, there’s a lot you can do on your own.
Let’s take a look at Raspberry PI for digital signage, what it is, how it works, and which model is the best.
What is Raspberry PI?
If you aren’t already familiar with Raspberry PI, it’s a very neat little piece of technology. It was originally developed to help people learn programming. By now, it’s developed into what is essentially a computer that fits in the palm of your hand.
It’s a USB device you can plug into any display, and then use a keyboard and mouse to use the entire setup much like you would with a normal desktop computer.
The default barebones OS for Raspberry PI is sufficient to run your playlists, or you can choose to install one of a wide variety of other operating systems, such as Windows IoT Core or Ubuntu Core.
The latest version is Raspberry PI 4, which is the best version yet.
Leverage Your Screens To The Max
TelemetryTV is the only digital signage software you need to drive engagement, productivity and revenue for your business.
Learn More
Which Raspberry PI Device is the Best for Digital Signage in 2022?

Easiest and best option for beginners:
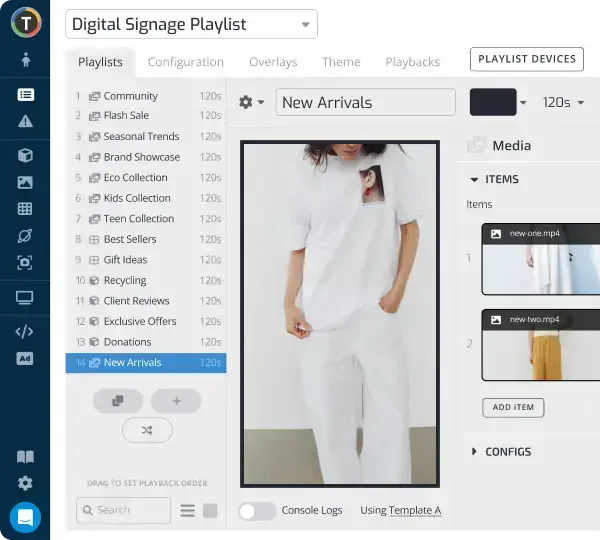
TelemetryTV Raspberry Pi 4 kit
TelemetryTV’s very own Raspberry Pi 4 kit provides a complete solution that has everything you need pre-installed. After buying the kit, simply boot up Raspberry Pi and pair the device with your TelemetryTV account.
Then, you’ll be all set to use it as your digital signage media player.
Pros:
- Includes everything you need
- TelemetryTV Box OS pre-installed
- Simple for beginners
- Ideal for professional digital signage use cases
Cons:
- Not intended for use cases outside of digital signage
The runner up
Labists Raspberry Pi 4
Pros:
- 1.5GHz quad-core ARM Cortex-A72 CPU for 500Mhz of processing power
- Also available in three options for RAM
- Starter kits are highly rated
Cons:
- Available by fewer retailers than some other brands
Non-RPI devices for plug and play digital signage
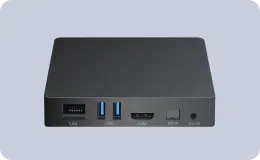
TelemetryTV Box
This option is available as a convenient kit that includes pre-installed TelemetryTV Box OS—our purpose-built, digital-signage-specific operating system. It’s easy to use, just follow our start up guide.
Pros:
- Simple to manage at scale
- Doesn’t need a fan
- Compact size
Cons:
- Only comes with a one-year warranty
- Plastic instead of metal casing
How to Use Raspberry PI for Digital Signage

It should be said that using Raspberry PI for digital signage is not totally beginner friendly. But if you refer to the included start guide with your Raspberry PI device, and you do a bit of Googling, you should be able to set one up without professional help.
Most Raspberry PI devices are sold in a kit that includes everything you need. A kit typically consists of the device itself, an SD card, a power supply, a mini fan for cooling the processor, and sometimes an mHDMI to HDMI cable.
The SD card often comes pre-loaded with an OS. This is great since it saves you the trouble of loading one up yourself.
Once you’re all set up, you can simply access your cloud-based digital signage CMS (content management system) using the device, and play your content.
It’s very easy to manage once you have it all set up. Then, you can focus on developing your content and executing a targeted digital signage content campaign.
The Downsides of Using Raspberry PI for Digital Signage
No DIY solution is without its cons in the tech world. There are several things to be aware of if you choose to use Raspberry PI for digital signage.
Namely, it’s not always easy to set up, it isn’t scalable, it doesn’t include any support, and it doesn’t offer the best bang for your buck compared to other digital signage player options.
If you’re good with each of these cons, then Raspberry PI 4 (much improved for use with digital signage over its predecessors) could prove to be a great choice for you.
Afterall, it’s still amazingly affordable when you consider how things were not long ago, and extremely convenient once you have it all figured out.
Try the TelemetryTV App with Your Raspberry PI Device

Try a 14-day trial of the TelemetryTV app for free and use it to build playlists, deploy digital content across any number of screens at once, and even develop your own custom content in-app using the included templates.
Management couldn’t be easier. You can log into your TelemetryTV account through any device with a browser and have access to all of your tools, functions, and content on the fly.
Check out our device guide to learn more about how to set up digital signage for your business using Raspberry Pi 4.
Request a free demo and get a case by case breakdown of how digital signage powered by Raspberry PI and TelemetryTV would benefit your business.
Start using TelemetryTV and Raspberry PI now as a cost-effective solution to your signage needs.